
Chapter 23. Security - JBoss Seam 1.1.1 正式版英文参考手册
The Seam Security API is an optional Seam module that provides authentication and authorization features for securing both domain and page resources within your Seam project. It supports multiple levels of security granularity, making it capable of performing either simple role-based security checks, or at the other end of the scale complex rule-based permission checks on domain objects using JBoss Rules.
The Seam security API provides the following features for securing a Seam application.
The authentication component of the security API is based on JAAS, allowing authentication to be carried out against one or more configurable login modules. The security API provides a login module that delegates authentication to a Seam component, making it easy to authenticate a user using the application's domain objects.
This feature allows direct access to page resources to be controlled based on the set of roles granted to the requesting user. Using a servlet filter, each request to a protected resource is validated to ensure that the user has the necessary roles to access the resource.
The s:hasRole() and s:hasPermission() EL functions can be used within the pages of an application to control which parts of a page are rendered based on the security level of the user. On the model side, component classes and/or their methods can also be annotated with the very same EL expressions to restrict the execution of methods based on the current security context.
By integrating with JBoss Rules, the security API is able to make security decisions by evaluating a set of user-defined security rules defined at deployment time. This feature allows any security checks to carry out a decision-making process which can be as simple or as complex as required, while taking into account the state of any objects asserted into the security context for the check.
The first step in configuring Seam Security is to install the SeamSecurityManager and SecurityConfiguration components, as they are not installed by default. The SeamSecurityManager component is the core of the Seam Security API, and is responsible for loading security rules, and performing role and permission checks. SecurityConfiguration is used to load role and page security configuration from a configuration file (or can be extended to load this configuration from an alternative source, such as a database). The following entries in components.xml will install these two components:
<!DOCTYPE components PUBLIC "-//JBoss/Seam Component Configuration DTD 1.1//EN"
  "http://jboss.com/products/seam/components-1.1.dtd">

<components>
  <!-- Install a Security Configuration -->
  <component class="org.jboss.seam.security.config.SecurityConfiguration"/>

  <!-- Install the Seam Security Manager -->
  <component class="org.jboss.seam.security.SeamSecurityManager"/>

</components>
The next step is to configure roles. While this step is optional (it is possible for a user to belong to a role even if it is not configured here), it is necessary if either 1) explicit permissions are required by your application, or 2) roles require membership of other roles. Create a file called security-config.xml, which goes in the META-INF directory of the Seam application's jar file. Here's an example security-config.xml file with a few roles defined.
<security-config>

  <roles>
    <role name="admin">
      <memberships>superuser</memberships>

      <permissions>
        <permission name="user" action="create"/>
        <permission name="user" action="modify"/>
        <permission name="user" action="delete"/>
      </permissions>
    </role>

    <role name="superuser">
      <memberships>user</memberships>

      <permissions>
        <permission name="account" action="create"/>
        <permission name="account" action="delete"/>
      </permissions>
    </role>

    <role name="user">
      <permissions>
        <permission name="customer" action="create"/>
        <permission name="customer" action="delete"/>
      </permissions>
    </role>

    <role name="guest">

    </role>

  </roles>

</security-config>
In the above example, we can see that there are four distinct roles: admin, superuser, user and guest. Strictly speaking, the guest entry is redundant as it declares no permissions nor contains any memberships of other roles. What is most of interest here are the permissions and role memberships, which are explained in further detail as follows.
These are permissions which are explicitly granted to members of a role. Explicit permissions are used to address simple security concerns, such as "may this user create a new customer record?", or "may this user view customer details?". While it is possible to perform a more complex contextual-based decision to grant a specific permission or not, explicit permissions allow simple decision-less permissions to be easily granted to certain groups of users. How these permissions are used will be explained further on.
Role memberships are a simple inheritence feature designed to make it easier to build a security model from the ground up. In the above example, it can be seen that the admin role contains a membership of the superuser role. What this means, is that any explicit permissions that the superuser has, whether they were granted to the superuser role directly or inherited from further up, are automatically granted to the admin user also, as a result of its membership.
The following table illustrates this concept by showing the permissions granted to each role based on the above security-config.xml example.
Table 23.1. Permissions granted to example roles
Role | Permission | Source |
|---|---|---|
user | customer:create | Assigned directly |
user | customer:delete | Assigned directly |
superuser | customer:create | Inherited from user |
superuser | customer:delete | Inherited from user |
superuser | account:create | Assigned directly |
superuser | account:delete | Assigned directly |
admin | customer:create | Inherited from superuser |
admin | customer:delete | Inherited from superuser |
admin | account:create | Inherited from superuser |
admin | account:delete | Inherited from superuser |
admin | user:create | Assigned directly |
admin | user:modify | Assigned directly |
admin | user:delete | Assigned directly |
Page security is used to restrict direct access to web resources based on the user's roles. It requires the Seam security filter (a servlet filter - see the next section) to be installed. To configure page security, security-constraint entries must be created within security-config.xml to control which web resources are accessible to which roles. The restricted web resources are defined using a url-pattern expression. The following example demonstrates how all of the *.seam resources in the /secure directory are restricted to users in the admin role.
<security-config>

  <security-constraint>
    <web-resource-collection>
      <web-resource-name>Secure Page</web-resource-name>
      <url-pattern>/secure/*</url-pattern>
    </web-resource-collection>

    <auth-constraint>
      <role-name>admin</role-name>
    </auth-constraint>
  </security-constraint>

</security-config>
This configuration may look familiar, because it is the same format defined by the servlet specification, and as such follows the same wildcard conventions. I.e. at the end of a pattern, /* matches any sequence of characters from that point forward, and the pattern *.extension matches any resources ending with .extension. An asterisk in any other position is not a wildcard.
So what happens when a user tries to access a page that they don't have the necessary rights for? By default, the security filter redirects these requests to the /securityError.seam page. This page can be overridden by setting the securityErrorPage property of the SecurityConfiguration component in components.xml:
  <component class="org.jboss.seam.security.config.SecurityConfiguration">
    <property name="securityErrorPage">/security/generalSecurityError.seam</property>
  </component>
The Seam security filter is a servlet filter that provides page security features. It is an optional component in that if your application does not require page security, then there is no requirement to install the security filter. To configure which pages are secure, see the previous section on page security. To configure the security filter, add the following entries to web.xml:
    <!-- Seam security filter -->

    <filter>
      <filter-name>Seam Security Filter</filter-name>
      <filter-class>org.jboss.seam.security.filter.SeamSecurityFilter</filter-class>
    </filter>

    <filter-mapping>
      <filter-name>Seam Security Filter</filter-name>
      <url-pattern>*.seam</url-pattern>
    </filter-mapping>
It is a relatively straight forward process to set up authentication. The first step is to configure the login modules that are to be used within the project by adding one or more application-policy entries to security-config.xml.
  <application-policy>
    <authentication>
      <login-module code="org.jboss.seam.security.spi.SeamLoginModule" flag="required">
        <module-option name="authMethod">#{login.authenticate}</module-option>
      </login-module>
    </authentication>
  </application-policy>
An application-policy without a specified name will be given a default name. It is possible to create multiple application policies if required, with each one having its own set of login modules.
  <application-policy>  <!-- default policy -->
    <authentication>
      <login-module ...
    </authentication>
  </application-policy>

  <application-policy name="special">
    <authentication>
      <login-module ...
    </authentication>
  </application-policy>
The login module configuration should look familiar if you've ever used JAAS before. Each login module should have its own login-module entry, specifying the fully qualified class name of the login module class, plus the flag for the login module. It is also possible to configure additional options for each login module, by including module-option entries as children of the login-module entry. Flag values are found in the JSE API documentation for javax.security.auth.login.Configuration, but are repeated here for convenience:
Table 23.2. JAAS Configuration Flags
Flag | Description |
|---|---|
Required | The LoginModule is required to succeed. If it succeeds or fails, authentication still continues to proceed down the LoginModule list. |
Requisite | The LoginModule is required to succeed. If it succeeds, authentication continues down the LoginModule list. If it fails, control immediately returns to the application (authentication does not proceed down the LoginModule list). |
Sufficient | The LoginModule is not required to succeed. If it does succeed, control immediately returns to the application (authentication does not proceed down the LoginModule list). If it fails, authentication continues down the LoginModule list. |
Optional | The LoginModule is not required to succeed. If it succeeds or fails, authentication still continues to proceed down the LoginModule list. |
One of the simplest ways to authenticate a user is to delegate the authentication to a Seam component. There is a special login module, SeamLoginModule that allows this. Configure this login module in security-config.xml, and in its authMethod option specify an EL method expression. By default the method that you specify should accept the parameters [java.lang.String, java.lang.String, java.util.Set], however this can be customised (see section further down). The third java.util.Set parameter is a set to which the authentication method should add any roles that the authenticating user is a member of. Here's a complete example:
@Name("authenticator")
public class AuthenticatorAction
{
  @In(create=true)
    private EntityManager entityManager;

  public boolean authenticate(String username, String password, Set<String> roles)
  {
    try
    {
       User user = (User) entityManager.createQuery(
          "from User where username = :username and password = :password")
          .setParameter("username", username)
          .setParameter("password", password)
          .getSingleResult();

       for (UserRole r : user.getRoles())
          roles.add(r.getName());

       return true;
    }
    catch (NoResultException ex)
    {
       log.warn("Invalid username/password");
       return false;
    }
  }
}
Based on the above example, the EL expression that would need to be specified in the authMethod option for the login module would be #{authenticator.authenticate}.
Now that the login module has been configured, and an authentication method written, all that is left is to perform a JAAS login. This is the easiest step, as shown by the following example:
   public void login()
   {
      try
      {
         CallbackHandler cbh = SeamSecurityManager.instance().createCallbackHandler(
               user.getUsername(), user.getPassword());

         LoginContext lc = SeamSecurityManager.instance().createLoginContext(null, cbh);
         lc.login();
      }
      catch (LoginException ex)
      {
         FacesMessages.instance().add("Invalid login");
      }
   }
The first thing that happens in the above code is the creation of a CallbackHandler which is going to be responsible for providing the user's credentials (their username and password) to the login module. The CallbackHandler is created by a convenience method in SeamSecurityManager, and knows how to handle NameCallback and PasswordCallback callback types.
The next thing that happens is the creation of a LoginContext. There is a factory method in SeamSecurityManager for creating this, as the login context doesn't use the standard configuration (it uses an application-specific configuration). If the application policy isn't configured with a name, then it will have a default name and the String parameter passed to createLoginContext() can be null. If your application has multiple application policies configured, then you can specify which one to use by providing the policy name to createLoginContext():
LoginContext lc = SeamSecurityManager.instance().createLoginContext("special", cbh);
The final step is the call to lc.login(), which calls each of the configured login modules in turn, passing in the callback handler to each one and performing an authentication based on the configured login module flags.
Once the user is successfully authenticated, calls to Identity.loggedIn() will return true for the duration of the session.
In some situations it may be necessary to perform authentication that isn't based on a simple username/password combination. The good news is that this is not very difficult, however it requires a few additional steps. This section will walk through an example where authentication requires a Company ID in addition to a username and password.
The first step is to subclass the SeamLoginModule class and override the getLoginParams() method to return the appropriate parameters for the custom authentication method.
public class CustomLoginModule extends SeamLoginModule
{
   @Override public Object[] getLoginParams()
      throws Exception
   {
      CompanyCallback cbCompany = new CompanyCallback("Enter company ID");
      NameCallback cbName = new NameCallback("Enter username");
      PasswordCallback cbPassword = new PasswordCallback("Enter password", false);

      // Get the username and password from the callback handler
      callbackHandler.handle(new Callback[] { cbCompany, cbName, cbPassword });
      username = cbName.getName();

      return new Object[] { cbCompany.getCompanyId(), username,
                            new String(cbPassword.getPassword()), roles };
   }
}
Since CompanyCallback is a custom callback it needs to be created also:
public class CompanyCallback implements Callback, Serializable {
  private String prompt;
  private int companyId;
  public CompanyCallback(String prompt) {
    if (prompt == null || "".equals(prompt))
      throw new IllegalArgumentException();
    this.prompt = prompt;
  }
  public String getPrompt() {
    return prompt;
  }
  public int getCompanyId() {
    return companyId;
  }
  public void setCompanyId(int companyId) {
    this.companyId = companyId;
  }
}
So far so good, now it's time to configure the custom login module in security-config.xml:
  <loginmodules>
    <loginmodule class="com.acme.security.CustomLoginModule" flag="required">
      <option name="paramTypes">java.lang.Integer,java.lang.String,java.lang.String,java.util.Set</option>
      <option name="authMethod">#{authenticator.authenticate}</option>
    </loginmodule>
  </loginmodules>
The important thing to note above is that the paramTypes option is specified, based on the customised parameters that are going to be sent to the authentication method. Now that they have been configured, it is time to write the authentication method:
@Name("authenticator")
public class CustomAuthenticator {
  @In(create=true)
  private EntityManager entityManager;

  public boolean authenticate(int companyId, String username, String password, Set<String> roles)
  {
    try
    {
       User user = (User) entityManager.createQuery(
          "from User where companyId = :companyId and username = :username and password = :password")
          .setParameter("companyId", companyId)
          .setParameter("username", username)
          .setParameter("password", password)
          .getSingleResult();

       for (UserRole r : user.getRoles())
          roles.add(r.getName());

       return true;
    }
    catch (NoResultException ex)
    {
       log.warn("Invalid username/password");
       return false;
    }
  }
}
As can be seen in the above example, the customised authentication method contains the additional companyId parameter. The last thing to do is write a login method:
@Name("loginAction")
public class LoginAction implements LoginLocal {
   @In(create = true) EntityManager entityManager;
   @In(required = false) User user;

   public void login()
   {
      try
      {
         CallbackHandler cbh = createCallbackHandler(user.getCompanyId(),
               user.getUsername(), user.getPassword());

         LoginContext lc = SeamSecurityManager.instance().createLoginContext(cbh);
         lc.login();
      }
      catch (LoginException ex)
      {
         FacesMessages.instance().add("Invalid login");
      }
   }

   private CallbackHandler createCallbackHandler(final int companyId,
         final String username, final String password)
   {
      return new CallbackHandler() {
         public void handle(Callback[] callbacks)
            throws IOException, UnsupportedCallbackException
         {
            for (int i = 0; i < callbacks.length; i++)
            {
               if (callbacks[i] instanceof CompanyCallback)
                  ((CompanyCallback) callbacks[i]).setCompanyId(companyId);
               else if (callbacks[i] instanceof NameCallback)
                  ((NameCallback) callbacks[i]).setName(username);
               else if (callbacks[i] instanceof PasswordCallback)
                  ((PasswordCallback) callbacks[i]).setPassword(password.toCharArray());
               else
                  throw new UnsupportedCallbackException(callbacks[i],
                        "Unsupported callback");
            }

         }
      };
   }
The most significant thing to note in the above code is the createCallbackHandler() method. It returns a callback handler that knows how to handle a CompanyCallback, in addition to the standard NameCallback and PasswordCallback.
That wraps up the creation of a customised authentication process. Based on the above steps, it should be possible to create a customised authentication based on any combination of credentials.
The authorization features of the Seam security API make it possible to restrict access to a Seam component based on the roles and permissions granted to the authenticated user. Security restrictions are defined using EL expressions, and configured by annotating either a Seam component method, or the component class itself, with the @Restrict annotation.
The Seam security API provides two types of authorization checks; role checks and permission checks. Role checks are simple checks to determine if a user is a member of a specific role. They are equivalent in function to the isUserInRole() method found within the servlet specification. Role checks can be performed by using the s:hasRole() EL function. Here's a few examples of role checks.
This first example demonstrates how to restrict access to the Seam component secureAction to all users besides those in the admin role.
@Name("secureAction")
@Restrict("#{s:hasRole('admin')}")
public class SecureAction {
   // ...
}
This example demonstrates how to restrict access to a method of a Seam component to users in the superuser role.
  @Restrict("#{s:hasRole('superuser')}")
  public void secureMethod {
    // ...
  }
This last example shows how an inline security check can be performed within the body of a method, rather than using the @Restrict annotation.
  public String changeUserPassword() {
    // code here
    Identity.instance().checkRestriction("#{s:hasRole('superuser')}");
    // code here
  }
The first time that a permission check is performed after a user is authenticated, a security context is created for that user and placed into the user's session context. This security context (which in fact is an instance of org.drools.WorkingMemory) is populated with all of the Principals for the authenticated user, plus all of the explicitly granted permissions granted to the user's role/s, as instances oforg.jboss.seam.security.SeamPermission. To make this a little clearer, here's a diagram:
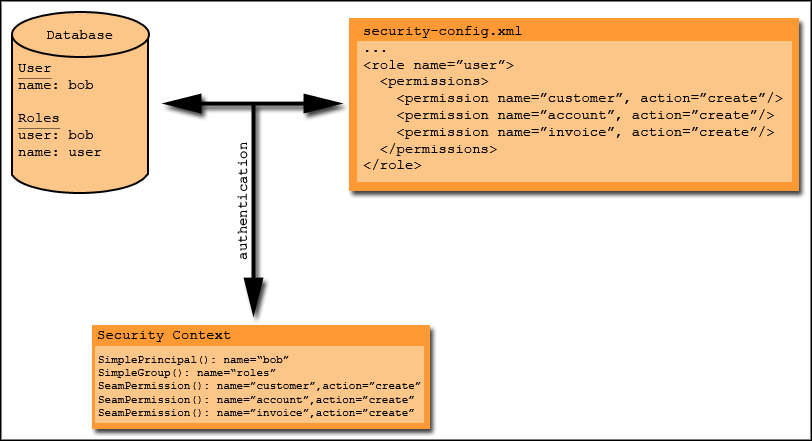
In this diagram, the database contains a user "bob", who is a member of the "user" role. The security configuration file, security-config.xml defines a role called "user" that has the explicitly assigned permissions customer:create, account:create and invoice:create. After bob authenticates, his Security Context will contain all of the permissions granted to him through his role memberships, as well as any Principals created as a result of the authentication process. This includes his roles, which exist in a SimpleGroup principal with the name of "roles".
As mentioned previously, permissions can either be explicitly granted, or they can be granted as the result of a rule-based decision. Strictly speaking though, all permissions must be granted via a security rule; this includes explicit permissions also. By having all permissioning under the control of the rule engine, it is easier to configure any custom security requirements for your application. So what does this mean? For starters, granting explicit permissions without specifying a minimal security policy will mean that any security checks for those permissions will fail. What does a minimal security policy look like? Here's an example security-rules.drl file with a default security policy defined:
package MyProjectPermissions;

import org.jboss.seam.security.Identity;
import org.jboss.seam.security.rules.PermissionCheck;
import org.jboss.seam.security.SeamPermission;

rule DefaultPolicy
  salience -10
  activation-group "permissions"
when
  c: PermissionCheck(granted == false)
  p: SeamPermission()
  eval( p.getName().equals(c.getName()) && p.getAction().equals(c.getAction()))
then
  c.grant();
end;
If you're familiar with JBoss Rules then this example should make at least some sense already. In a nutshell, what this rule does is "catch" any permission checks that haven't already been granted by any higher priority rules, and grant the permission if a SeamPermission instance having the same name and action as the PermissionCheck exists within the security context.
A couple of notes about this rule; first of all, the salience -10 line means that this rule will have a lower priority than any other rules with a higher salience (the default salience if not specified is 0). This assigns rules for any dynamic permissions (that don't have an explicit SeamPermission in the security context) a higher firing priority. Secondly, the activation-group value means that once the first rule within the activation group fires, no other rules within the same activation group will fire.