Chapter 13. Configuring Seam and packaging Seam applications - JBoss Seam 1.1.0 cr2 英文参考手册
Configuration is a very boring topic and an extremely tedious pastime. Unfortunately, several lines of XML are required to integrate Seam into your JSF implementation and servlet container. There's no need to be too put off by the following sections; you'll never need to type any of this stuff yourself, since you can just copy and paste from the example applications!
First, let's look at the basic configuration that is needed whenever we use Seam with JSF.
Seam requires the following entry in your web.xml file:
<listener>
    <listener-class>org.jboss.seam.servlet.SeamListener</listener-class>
</listener>
This listener is responsible for bootstrapping Seam, and for destroying session and application contexts.
If you are using Seam in Apache MyFaces (and possibly some other JSF implementations), you must use client-side state saving. So you'll also need this in web.xml:
<context-param>
    <param-name>javax.faces.STATE_SAVING_METHOD</param-name>
    <param-value>client</param-value>
</context-param>
To integrate with the JSF request lifecycle, we also need a JSF PhaseListener registered in in the faces-config.xml file:
<lifecycle>
    <phase-listener>org.jboss.seam.jsf.SeamPhaseListener</phase-listener>
</lifecycle>
The actual listener class here varies depending upon how you want to manage transaction demarcation (more on this below).
If you are using Sun's JSF 1.2 reference implementation, you should add this to faces-config.xml:
<application>
    <el-resolver>org.jboss.seam.jsf.SeamELResolver</el-resolver>
</application>
(This line should not strictly speaking be necessary, but it works around a minor bug in the RI.)
We need to apply the SeamInterceptor to our Seam components. The simplest way to do this is to add the following interceptor binding to the <assembly-descriptor> in ejb-jar.xml:
<interceptor-binding>
    <ejb-name>*</ejb-name>
    <interceptor-class>org.jboss.seam.ejb.SeamInterceptor</interceptor-class>
</interceptor-binding>
Seam needs to know where to go to find session beans in JNDI. One way to do this is specify the @JndiName annotation on every session bean Seam component. However, this is quite tedious. A better approach is to specify a pattern that Seam can use to calculate the JNDI name from the EJB name. Unfortunately, there is no standard mapping to global JNDI defined in the EJB3 specification, so this mapping is vendor-specific. We must specify a pattern using the configuration property named org.jboss.seam.core.init.jndiPattern. We may specify this using components.xml, web.xml or even seam.properties.
For JBoss AS, the following pattern is correct:
<core:init jndi-name="myEarName/#{ejbName}/local" />Or:
<context-param>
    <param-name>org.jboss.seam.core.init.jndiPattern</param-name>
    <param-value>myEarName/#{ejbName}/local</param-value>
</context-param>
Where myEarName is the name of the EAR in which the bean is deployed.
Outside the context of an EAR (when using the JBoss Embeddable EJB3 container), the following pattern is the one to use:
<core:init jndi-name="#{ejbName}/local" />Or:
<context-param>
    <param-name>org.jboss.seam.core.init.jndiPattern</param-name>
    <param-value>#{ejbName}/local</param-value>
</context-param>If you want to use post-then-redirect in JSF, and you want Seam to propagate the conversation context across the browser redirects, you need to register a servlet filter:
<filter>
    <filter-name>Seam Redirect Filter</filter-name>
    <filter-class>org.jboss.seam.servlet.SeamRedirectFilter</filter-class>
</filter>

<filter-mapping>
    <filter-name>Seam Redirect Filter</filter-name>
    <url-pattern>*.jsf</url-pattern>
</filter-mapping>
This filter intercepts any browser redirects and adds a request parameter that specifies the Seam conversation id.

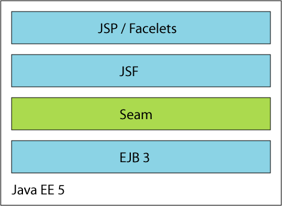
If you're running in a Java EE 5 environment, this is all the configuration required to start using Seam! But there is one final item you need to know about. You must place a seam.properties file in the root of any archive in which your Seam components are deployed (even an empty properties file will do). At startup, Seam will scan any archives with seam.properties files for seam components. If that doesn't work for you, you can also add components by installing them explicitly in components.xml. (We don't recommend this alternative approach.)
Once you've packaged all this stuff together into an EAR, the archive structure will look something like this:
my-application.ear/
    jboss-seam.jar
    META-INF/
        MANIFEST.MF
        application.xml
    my-application.war/
        META-INF/
            MANIFEST.MF
        WEB-INF/
            web.xml
            components.xml
            faces-config.xml
        login.jsp
        register.jsp
        ...
    my-application.jar/
        META-INF/
            MANIFEST.MF
            persistence.xml
        seam.properties
        org/
            jboss/
                myapplication/
                    User.class
                    Login.class
                    LoginBean.class
                    Register.class
                    RegisterBean.class
                    ...
Make sure you reference jboss-seam.jar from manifests of the EJB-JAR and WAR.
Seam ships with several example applications that are deployable in any Java EE container that supports EJB 3.0.
I really wish that was all there was to say on the topic of configuration but unfortunately we're only about a third of the way there. If you're too overwhelmed by all this tedious configuration stuff, feel free to skip over the rest of this section and come back to it later.
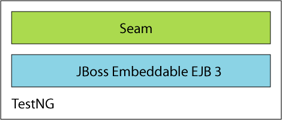
The JBoss Embeddable EJB3 container lets you run EJB3 components outside the context of the Java EE 5 application server. This is especially, but not only, useful for testing.
The Seam booking example application includes a TestNG integration test suite that runs on the Embeddable EJB3 container.

The booking example application may even be deployed to Tomcat.

Seam ships with a build of the Embeddable EJB3 container in the embedded-ejb directory. To use the Embeddable EJB3 container with Seam, add the embedded-ejb/conf directory, and all jars in the lib and embedded-ejb/lib directories to your classpath. Then, add the following line to components.xml:
<core:ejb />
This setting installs the built-in component named org.jboss.seam.core.ejb. This component is responsible for bootstrapping the EJB container when Seam is started, and shutting it down when the web application is undeployed.
You should refer to the Embeddable EJB3 container documentation for more information about configuring the container. You'll probably at least need to set up your own datasource. Embeddable EJB3 is implemented using the JBoss Microcontainer, so it's very easy to add new services to the minimal set of services provided by default. For example, I can add a new datasource by putting this jboss-beans.xml file in my classpath:
<?xml version="1.0" encoding="UTF-8"?>

<deployment xmlns:xsi="http://www.w3.org/2001/XMLSchema-instance"
            xsi:schemaLocation="urn:jboss:bean-deployer bean-deployer_1_0.xsd"
            xmlns="urn:jboss:bean-deployer">

   <bean name="bookingDatasourceBootstrap"
        class="org.jboss.resource.adapter.jdbc.local.LocalTxDataSource">
      <property name="driverClass">org.hsqldb.jdbcDriver</property>
      <property name="connectionURL">jdbc:hsqldb:.</property>
      <property name="userName">sa</property>
      <property name="jndiName">java:/bookingDatasource</property>
      <property name="minSize">0</property>
      <property name="maxSize">10</property>
      <property name="blockingTimeout">1000</property>
      <property name="idleTimeout">100000</property>
      <property name="transactionManager">
        <inject bean="TransactionManager"/>
      </property>
      <property name="cachedConnectionManager">
        <inject bean="CachedConnectionManager"/>
      </property>
      <property name="initialContextProperties">
        <inject bean="InitialContextProperties"/>
      </property>
   </bean>

   <bean name="bookingDatasource" class="java.lang.Object">
      <constructor factoryMethod="getDatasource">
         <factory bean="bookingDatasourceBootstrap"/>
      </constructor>
   </bean>

</deployment>The archive structure of a WAR-based deployment on an servlet engine like Tomcat will look something like this:
my-application.war/
    META-INF/
        MANIFEST.MF
    WEB-INF/
        web.xml
        components.xml
        faces-config.xml
        lib/
            jboss-seam.jar
            myfaces-api.jar
            myfaces-impl.jar
            jboss-ejb3.jar
            jboss-jca.jar
            jboss-j2ee.jar
            ...
            mc-conf.jar/
                ejb3-interceptors-aop.xml
                embedded-jboss-beans.xml
                default.persistence.properties
                jndi.properties
                login-config.xml
                security-beans.xml
                log4j.xml
            my-application.jar/
                META-INF/
                    MANIFEST.MF
                    persistence.xml
                    jboss-beans.xml
                log4j.xml
                seam.properties
                org/
                    jboss/
                        myapplication/
                            User.class
                            Login.class
                            LoginBean.class
                            Register.class
                            RegisterBean.class
                            ...
    login.jsp
    register.jsp
    ...
The mc-conf.jar just contains the standard JBoss Microcontainer configuration files for Embeddable EJB3. You won't usually need to edit these files yourself.
Most of the Seam example applications may be deployed to Tomcat by running ant deploy.tomcat.
EJB session beans feature declarative transaction management. The EJB container is able to start a transaction transparently when the bean is invoked, and end it when the invocation ends. If we write a session bean method that acts as a JSF action listener, we can do all the work associated with that action in one transaction, and be sure that it is committed or rolled back when we finish processing the action. This is a great feature, and all that is needed by many Seam applications.
There is just one problem with this approach. ORM solutions like Hibernate and EJB 3.0 persistence support lazy fetching of entity associations inside a transaction context, but throw LazyInitializationExceptions if you try to access an unfetched association outside the context of a transaction. This is a problem if your view page tries to access data that was not fetched during the transaction. Hibernate users developed the open session in view pattern to work around this problem. This pattern is usually implemented as a transaction which spans the entire request. There are several problems with this idea, the most serious being that we can't be sure that a transaction has been successful until we commit it, but by the time we commit the transaction, we have already rendered the view. Furthermore, this is at best a partial solution to the problem, because we can still meet the dreaded LazyInitializationException if we try to re-use the entity object in the next request.
Seam completely solves the problem of unwanted LazyInitializationExceptions, while working around the biggest problem in the open session in view pattern. The solution comes in two parts:
use an extended persistence context that is scoped to the conversation, instead of to the request
use two transactions per request; the first spans the beginning of the update model values phase until the end of the invoke application phase; the second spans the render response phase
To make use of Seam managed transactions, you need to use SeamExtendedManagedPersistencePhaseListener in place of SeamPhaseListener.
<lifecycle>
     <phase-listener>
        org.jboss.seam.jsf.SeamExtendedManagedPersistencePhaseListener
    </phase-listener>
</lifecycle>
It's also a good idea to add a servlet filter to rollback uncommitted transactions when uncaught exceptions occur.
<filter>
    <filter-name>Seam Exception Filter</filter-name>
    <filter-class>org.jboss.seam.servlet.SeamExceptionFilter</filter-class>
</filter>

<filter-mapping>
    <filter-name>Seam Exception Filter</filter-name>
    <url-pattern>*.jsf</url-pattern>
</filter-mapping>You'll need to use a managed persistence context (for EJB3) or managed session (for Hibernate) in your components. We'll see how to use a managed session later. Configuring a managed persistence context is easy. In components.xml, we can write:
<core:managed-persistence-context name="bookingDatabase" auto-create="true"
    persistence-unit-jndi-name="java:/EntityManagerFactories/bookingData"/>
This configuration creates a conversation-scoped Seam component named bookingDatabase that manages the lifecycle of EntityManager instances for the persistence unit (EntityManagerFactory instance) with JNDI name java:/EntityManagerFactories/bookingData.
Of course, you need to make sure that you have bound the EntityManagerFactory into JNDI. In JBoss, you can do this by adding the following property setting to persistence.xml.
<property name="jboss.entity.manager.factory.jndi.name"
          value="java:/EntityManagerFactories/bookingData"/>
Now we can have our EntityManager injected using:
@In EntityManager bookingDatabase;
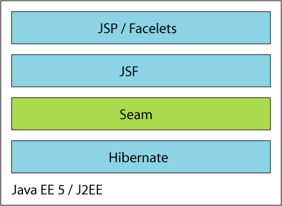
Seam is useful even if you're not yet ready to take the plunge into EJB 3.0. In this case you would use Hibernate3 instead of EJB 3.0 persistence, and plain JavaBeans instead of session beans. You'll miss out on some of the nice features of session beans but it will be very easy to migrate to EJB 3.0 when you're ready and, in the meantime, you'll be able to take advantage of Seam's unique declarative state management architecture.

Seam JavaBean components do not provide declarative transaction demarcation like session beans do. You could manage your transactions manually using the JTA UserTransaction (you could even implement your own declarative transaction management in a Seam interceptor). But most applications will use Seam managed transactions when using Hibernate with JavaBeans. Follow the instructions above to enable SeamExtendedManagedPersistencePhaseListener.
The Seam distribution includes a version of the booking example application that uses Hibernate and JavaBeans instead of EJB3. This example application is ready to deploy into any J2EE application server.
Seam will bootstrap a Hibernate SessionFactory from your hibernate.cfg.xml file if you install the built-in component named org.jboss.seam.core.hibernate.
We will also need to configure a managed session if we want a Seam managed Hibernate Session to be available via injection.
To configure our Seam component, as usual, we use components.xml:
<core:managed-hibernate-session name="hibernateSessionFactory"/>

<core:managed-hibernate-session name="bookingDatabase" auto-create="true"
    session-factory-jndi-name="java:/bookingSessionFactory"/>
Where java:/bookingSessionFactory is the name of the session factory specified in hibernate.cfg.xml.
<session-factory name="java:/bookingSessionFactory">
		<property name="transaction.flush_before_completion">true</property>
		<property name="connection.release_mode">after_statement</property>
		<property name="transaction.manager_lookup_class">org.hibernate.transaction.JBossTransactionManagerLookup</property>
		<property name="transaction.factory_class">org.hibernate.transaction.JTATransactionFactory</property>
		<property name="connection.datasource">java:/bookingDatasource</property>
    ...
</session-factory>
Note that Seam does not flush the session, so you should always enable hibernate.transaction.flush_before_completion to ensure that the session is automatically flushed before the JTA transaction commits.
We can now have a managed Hibernate Session injected into our JavaBean components using the following code:
@In Session bookingDatabase;
We can package our application as a WAR, in the following structure:
my-application.war/
    META-INF/
        MANIFEST.MF
    WEB-INF/
        web.xml
        components.xml
        faces-config.xml
        lib/
            jboss-seam.jar
            hibernate3.jar
            ...
            my-application.jar/
                META-INF/
                   MANIFEST.MF
                seam.properties
                hibernate.cfg.xml
                org/
                    jboss/
                        myapplication/
                            User.class
                            Login.class
                            Register.class
                            ...
    login.jsp
    register.jsp
    ...
If we want to deploy Hibernate in a non-J2EE environment like Tomcat or TestNG, we need to do a little bit more work.
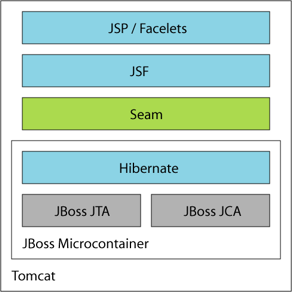
The Seam support for Hibernate requires JTA and a JCA datasource. If you are running in a non-EE environment like Tomcat or TestNG, you can run these services, and Hibernate itself, in the JBoss Microcontainer.
You can even deploy the Hibernate version of the booking example in Tomcat.

Seam ships with an example Microcontainer configuration in microcontainer/conf/jboss-beans.xml that provides all the things you need to run Seam with Hibernate in any non-EE environment. Just add the microcontainer/conf directory, and all jars in the lib and microcontainer/lib directories to your classpath. Refer to the documentation for the JBoss Microcontainer for more information.
The built-in Seam component named org.jboss.seam.core.microcontainer bootstraps the microcontainer. As before, we probably want to use a Seam managed session.
<core:microcontainer/>

<core:managed-hibernate-session name="bookingDatabase" auto-create="true"
    session-factory-jndi-name="java:/bookingSessionFactory"/>
Where java:/bookingSessionFactory is the name of the Hibernate session factory specified in hibernate.cfg.xml.
You'll need to provide a jboss.beans.xml file that installs JNDI, JTA, your JCA datasource and Hibernate into the microcontainer:
<?xml version="1.0" encoding="UTF-8"?>

<deployment xmlns:xsi="http://www.w3.org/2001/XMLSchema-instance"
            xsi:schemaLocation="urn:jboss:bean-deployer bean-deployer_1_0.xsd"
            xmlns="urn:jboss:bean-deployer">

   <bean name="Naming" class="org.jnp.server.SingletonNamingServer"/>

   <bean name="TransactionManagerFactory" class="org.jboss.seam.microcontainer.TransactionManagerFactory"/>
   <bean name="TransactionManager" class="java.lang.Object">
      <constructor factoryMethod="getTransactionManager">
         <factory bean="TransactionManagerFactory"/>
      </constructor>
   </bean>

   <bean name="bookingDatasourceFactory" class="org.jboss.seam.microcontainer.DataSourceFactory">
      <property name="driverClass">org.hsqldb.jdbcDriver</property>
      <property name="connectionUrl">jdbc:hsqldb:.</property>
      <property name="userName">sa</property>
      <property name="jndiName">java:/hibernateDatasource</property>
      <property name="minSize">0</property>
      <property name="maxSize">10</property>
      <property name="blockingTimeout">1000</property>
      <property name="idleTimeout">100000</property>
      <property name="transactionManager"><inject bean="TransactionManager"/></property>
   </bean>
   <bean name="bookingDatasource" class="java.lang.Object">
      <constructor factoryMethod="getDataSource">
         <factory bean="bookingDatasourceFactory"/>
      </constructor>
   </bean>

   <bean name="bookingDatabaseFactory" class="org.jboss.seam.microcontainer.HibernateFactory"/>
   <bean name="bookingDatabase" class="java.lang.Object">
      <constructor factoryMethod="getSessionFactory">
         <factory bean="bookingDatabaseFactory"/>
      </constructor>
      <depends>bookingDatasource</depends>
   </bean>

</deployment>The WAR could have the following structure:
my-application.war/
    META-INF/
        MANIFEST.MF
    WEB-INF/
        web.xml
        components.xml
        faces-config.xml
        lib/
            jboss-seam.jar
            hibernate3.jar
            ...
            jboss-microcontainer.jar
            jboss-jca.jar
            ...
            myfaces-api.jar
            myfaces-impl.jar
            mc-conf.jar/
                jndi.properties
                log4j.xml
            my-application.jar/
                META-INF/
                    MANIFEST.MF
                    jboss-beans.xml
                seam.properties
                hibernate.cfg.xml
                log4j.xml
                org/
                    jboss/
                        myapplication/
                            User.class
                            Login.class
                            Register.class
                            ...
    login.jsp
    register.jsp
...Seam's jBPM integration is not installed by default, so you'll need to enable jBPM by installing a built-in component. You'll also need to explicitly list your process and pageflow definitions. In components.xml:
<core:jbpm>
    <core:pageflow-definitions>
        <value>createDocument.jpdl.xml</value>
        <value>editDocument.jpdl.xml</value>
        <value>approveDocument.jpdl.xml</value>
    </core:pageflow-definitions>
    <core:process-definitions>
        <value>documentLifecycle.jpdl.xml</value>
    </core:process-definitions>
</core:jbpm>
No further special configuration is needed if you only have pageflows. If you do have business process definitions, you need to provide a jBPM configuration, and a Hibernate configuration for jBPM. The Seam DVD Store demo includes example jbpm.cfg.xml and hibernate.cfg.xml files that will work with Seam:
<jbpm-configuration>

  <jbpm-context>
    <service name="persistence">
       <factory>
          <bean class="org.jbpm.persistence.db.DbPersistenceServiceFactory">
             <field name="isTransactionEnabled"><false/></field>
          </bean>
       </factory>
    </service>
    <service name="message" factory="org.jbpm.msg.db.DbMessageServiceFactory" />
    <service name="scheduler" factory="org.jbpm.scheduler.db.DbSchedulerServiceFactory" />
    <service name="logging" factory="org.jbpm.logging.db.DbLoggingServiceFactory" />
    <service name="authentication" factory="org.jbpm.security.authentication.DefaultAuthenticationServiceFactory" />
  </jbpm-context>

</jbpm-configuration>
The most important thing to notice here is that jBPM transaction control is disabled. Seam or EJB3 should control the JTA transactions.
There is not yet any well-defined packaging format for jBPM configuration and process/pageflow definition files. In the Seam examples we've decided to simply package all these files into the root of the EAR. In future, we will probably design some other standard packaging format. So the EAR looks something like this:
my-application.ear/
    jboss-seam.jar
    jbpm-3.1.jar
    META-INF/
        MANIFEST.MF
        application.xml
    my-application.war/
        META-INF/
            MANIFEST.MF
        WEB-INF/
            web.xml
            components.xml
            faces-config.xml
        login.jsp
        register.jsp
        ...
    my-application.jar/
        META-INF/
            MANIFEST.MF
            persistence.xml
        seam.properties
        org/
            jboss/
                myapplication/
                    User.class
                    Login.class
                    LoginBean.class
                    Register.class
                    RegisterBean.class
                    ...
    jbpm.cfg.xml
    hibernate.cfg.xml
    createDocument.jpdl.xml
    editDocument.jpdl.xml
    approveDocument.jpdl.xml
    documentLifecycle.jpdl.xml
Remember to add jbpm-3.1.jar to the manifest of your EJB-JAR and WAR.
To run a Seam application as a portlet, you'll need to provide certain portlet metadata (portlet.xml, etc) in addition to the usual Java EE metadata. See the examples/portal directory for an example of the booking demo preconfigured to run on JBoss Portal.
In addition, you'll need to use a portlet-specific phase listener instead of SeamPhaseListener or SeamExtendedManagedPersistencePhaseListener. The SeamPortletPhaseListener and SeamExtendedManagedPersistencePortletPhaseListener are adapted to the portlet lifecycle.
