Chapter 3. XML descriptors - JBoss Portal 2.2 Reference Guide 英文版参考指南文档
To define your portals and page, you will need to create an XML files in order to declare your portlet, portlet instances, windows, pages and then your portals. All portal, page, and portlet instance deployment are handled by one file: *-object.xml.
It may be necessary at times for you to deploy your portlets and not have them assigned to any specific page, so an administrator can then use the management UI to place them where he wishes. This example walks the reader through deploying a portlet instance, but not assigning it to any specific page.
The helloworld-object.xml for a simple HelloWorldPortlet is described below:
            <?xml version="1.0" encoding="UTF-8"?>
               <deployments>
                  <deployment>
                     <if-exists>overwrite</if-exists>
                     <instance>
                        <instance-name>HelloWorldPortletInstance</instance-name>
                        <component-ref>helloworld.HelloWorldPortlet</component-ref>
                     </instance>
                  </deployment>
            </deployments>
A deployment file can be composed of a set of <deployments>. In our example, above, we are defining the HelloWorldPortletInstance, and referencing the HelloworldPortlet web application name and the definition in the portlet.xml. You can then use the Management Portlet (bundled with JBoss Portal) to modify the instances of this portlet, reposition it, and so on...
- <if-exists> Possible values are overwrite or keep . Overwrite will destroy the existing object and create a new one based on the content of the deployment. Keep will maintain the existing objct deployment or create a new one if it does not yet exist.
- <instance> The start of an instance definition. page.
- <instance-name> Name given to this instance of the portlet.
- <component-ref> Takes the name of the application followed by the name of the portlet, as defined in the portlet.xml
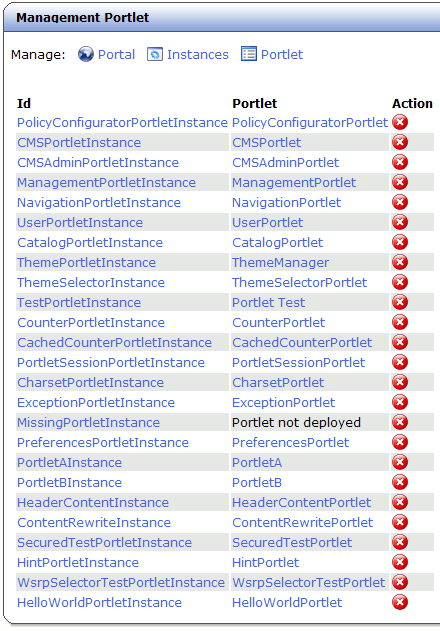
Once the portlet has been deployed (you can hot deploy it on a live instance of JBoss Portal, as well), you should see it in the Management Portlet under available portlet instances.

To illustrate our example, we have made available a portlet that you can download here: HelloWorld Portlet .
For our example we make available helloworld-object.xml located under helloworldportlet.war/WEB-INF/ , and it looks like this:
               <?xml version="1.0" encoding="UTF-8"?>
               <deployments>
                  <deployment>
                  <if-exists>overwrite</if-exists>
                     <parent-ref>default</parent-ref>
                        <properties/>
                        <page>
                        <page-name>Hello World</page-name>
                           <properties/>
                           <window>
                           <window-name>HelloWorldPortletWindow</window-name>
                           <instance-ref>HelloWorldPortletInstance</instance-ref>
                           <region>center</region>
                           <height>0</height>
                           </window>
                        </page>
                     </deployment>
                  <deployment>
                     <if-exists>overwrite</if-exists>
                     <instance>
                        <instance-name>HelloWorldPortletInstance</instance-name>
                        <component-ref>helloworld.HelloWorldPortlet</component-ref>
                     </instance>
                  </deployment>
               </deployments>
A deployment file can be composed of a set of <deployments>. In our example file, above, we are defining a page, placing the HelloWorldPortlet as a window on that page, and creating an instance of that portlet. You can then use the Management Portlet (bundled with JBoss Portal) to modify the instances of this portlet, reposition it, and so on...
- <if-exists> Possible values are overwrite or keep . Overwrite will destroy the existing object and create a new one based on the content of the deployment. Keep will maintain the existing objct deployment or create a new one if it does not yet exist.
- <parent-ref> Indicates whether the object should be hooked in to the portal tree.
- <properties> Properties definition specific to this page, commonly used to define the specific theme and layout to use. If not defined, the default portal layouts/theme combination will be used.
- <page> The start of a page definition.
- <page-name> The name of the page.
- <window> The start of a window definition.
- <window-name> The name of the window.
- <instance-ref> The instance reference used by this window. Should correspond with the <instance-name> variable.
- <height> The vertical position of this window within the region defined in the layout.
- <instance> The start of an instance definition. page.
- <instance-name> Maps to the above <instance-ref> variable.
- <component-ref> Takes the name of the application followed by the name of the portlet, as defined in the portlet.xml
To illustrate our example, we have made available a portlet that you can download here: HelloPortal .
For our example we make available helloworld-object.xml located under helloworldportlet.war/WEB-INF/ , and it looks like this:
               <?xml version="1.0" encoding="UTF-8"?>
               <deployments>
                  <deployment>
                     <parent-ref/>
                     <if-exists>overwrite</if-exists>
                     <portal>
                        <portal-name>HelloPortal</portal-name>
                        <properties>
                           <!-- Set the layout for the default portal -->
                           <!-- see also portal-layouts.xml -->
                           <property>
                              <name>layout.id</name>
                              <value>generic</value>
                           </property>
                           <!-- Set the theme for the default portal -->
                           <!-- see also portal-themes.xml -->
                           <property>
                              <name>theme.id</name>
                              <value>Nphalanx</value>
                           </property>
                           <!-- set the default render set name (used by the render tag in layouts) -->
                           <!-- see also portal-renderSet.xml -->
                           <property>
                              <name>theme.renderSetId</name>
                              <value>divRenderer</value>
                           </property>
                           <!-- set the default strategy name (used by the strategy interceptor) -->
                           <!-- see also portal-strategies.xml -->
                           <property>
                              <name>layout.strategyId</name>
                              <value>maximizedRegion</value>
                           </property>
                        </properties>
                        <supported-modes>
                           <mode>view</mode>
                           <mode>edit</mode>
                           <mode>help</mode>
                        </supported-modes>
                        <supported-window-states>
                           <window-state>normal</window-state>
                           <window-state>minimized</window-state>
                           <window-state>maximized</window-state>
                        </supported-window-states>
                        <page>
                           <page-name>default</page-name>
                           <properties/>
                           <window>
                              <window-name>HelloWorldPortletWindow</window-name>
                              <instance-ref>HelloWorldPortletInstance</instance-ref>
                              <region>center</region>
                              <height>0</height>
                           </window>
                        </page>
                     </portal>
                  </deployment>
                  <deployment>
                     <if-exists>overwrite</if-exists>
                     <parent-ref>HelloPortal</parent-ref>
                     <page>
                        <page-name>foobar</page-name>
                        <window>
                           <window-name>HelloWorldPortletWindow</window-name>
                           <instance-ref>HelloWorldPortletInstance</instance-ref>
                           <region>center</region>
                           <height>0</height>
                        </window>
                     </page>
                  </deployment>
                  <deployment>
                     <if-exists>overwrite</if-exists>
                     <instance>
                        <instance-name>HelloWorldPortletInstance</instance-name>
                        <component-ref>helloworld.HelloWorldPortlet</component-ref>
                     </instance>
                  </deployment>
               </deployments>
This example, when deployed, will register a new portal instance named HelloPortal with two pages in it. The portal instance can be accessed by navigating to: http://localhost:8080/portal/portal/HelloPortal for the default page, and http://localhost:8080/portal/portal/HelloPortal/foobar , for the second page created.
Note
You must define a page named default for any new portal instance to be accessible via a web browser.The portlet specification allows a portlet instance to override the preferences that were set in the portlet.xml. Using our HelloWorld example, we can demostrate how this is done in JBoss Portal.
In our sample helloworld-object.xml for a simple HelloWorldPortlet we will add preference attributes as such:
            <?xml version="1.0" encoding="UTF-8"?>
               <deployments>
                  <deployment>
                     <if-exists>overwrite</if-exists>
                     <instance>
                        <instance-name>HelloWorldPortletInstance</instance-name>
                        <component-ref>helloworld.HelloWorldPortlet</component-ref>
                        <preferences>
                           <preference>
                              <name>foo</name>
                              <value>bar</value>
                              <read-only>false</read-only>
                           </preference>
                        </preferences>
                     </instance>
                  </deployment>
            </deployments>
In the example above, we are overriding the portlet.xml preference named foo and assigning it a value, bar . From within our portlet now, we will access the preferences as the Portlet API allows:
String somePref = request.getPreferences().getValue("foo", "somedefaultvalue");
Likewise, you can specify in the *-object.xml descriptor, an array of preferences, as the specification allows:
            <preference>
               <name>foo</name>
               <value>hi</value>
               <value>hello</value>
               <value>yo!</value>
               <read-only>true</read-only>
            </preference>
            ...
