How to Use SpringLayout - Java Tutorial 5.0 英文版
|
|
Start of Tutorial > Start of Trail > Start of Lesson |
Search
Feedback Form |
Trail: Creating a GUI with JFC/Swing
Lesson: Laying Out Components Within a Container
How to Use SpringLayout
TheSpringLayoutclass was added in v 1.4 to support layout in GUI builders.
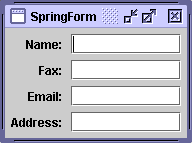
SpringLayoutis a very flexible layout manager that can emulate many of the features of other layout managers. This section starts with a simple example showing all the things you need to remember to create your first spring layout — and what happens when you forget them! Later it presents utility methods that let you lay out components in a couple of different types of grids.Here are pictures of some of the layouts we will cover:
How Spring Layouts Work
Spring layouts do their job by defining relationships between the edges of components. For example, you might define that the left edge of one component is a fixed distance (5 pixels, say) from the right edge of another component. By default, a spring layout defines the width and height of a component (the distance between its left and right edges and between its top and bottom edges) to be somewhere between the component's minimum and maximum sizes — if possible, at its preferred size.
Distances between edges are represented by
Springobjects. Each spring has four properties — its minimum, preferred, and maximum values, and its actual (current) value. The springs associated with each component are collected into aSpringLayout.Constraintsobject.
Example: SpringDemo
This section takes you through the typical steps of specifying the constraints for a container that uses
SpringLayout. The first example,SpringDemo1.java, is an extremely simple application that features a label and a text field in a content pane controlled by a spring layout. Here's the relevant code:
public class SpringDemo1 {
    public static void main(String[] args) {
        ...
        Container contentPane = frame.getContentPane();
        SpringLayout layout = new SpringLayout();
        contentPane.setLayout(layout);
        contentPane.add(new JLabel("Label: "));
        contentPane.add(new JTextField("Text field", 15));
        ...
        frame.pack();
        frame.setVisible(true);
    }
}
Here's what the GUI looks like when it first comes up:
Here's what it looks like when it's resized to be bigger:
Obviously, we have some problems. Not only does the frame come up way too small, but even when it's resized the components all are located at (0,0). This happens because we have set no springs specifying the components' positions and the width of the container. One small consolation is that at least the components are at their preferred sizes — we get that for free from the default springs created by
SpringLayoutfor each component.Our next example,
SpringDemo2.java, improves the situation a bit by specifying locations for each component. In this example, we'll specify that the components should appear in a single row, with 5 pixels between them. The following code specifies the location of the label:
The first//Adjust constraints for the label so it's at (5,5). layout.putConstraint(SpringLayout.WEST, label, 5, SpringLayout.WEST, contentPane); layout.putConstraint(SpringLayout.NORTH, label, 5, SpringLayout.NORTH, contentPane);putConstraintcall specifies that the label's left (west) edge should be 5 pixels from its container's left edge. This translates to an x coordinate of 5. The secondputConstraintcall sets up a similar relationship between the top (north) edges of the label and its container, resulting in a y coordinate of 5.Here is the code that sets up the location of the text field:
//Adjust constraints for the text field so it's at
//(<label's right edge> + 5, 5).
layout.putConstraint(SpringLayout.WEST, textField,
                     5,
                     SpringLayout.EAST, label);
layout.putConstraint(SpringLayout.NORTH, textField,
                     5,
                     SpringLayout.NORTH, contentPane);
The first
putConstraintcall makes the text field's left (west) edge be 5 pixels away from the label's right (east) edge. The secondputConstraintcall is just like the second call in the first snippet, and has the same effect of setting the component's y coordinate to 5.The previous example still has the problem of the container coming up too small. But when we resize the window, the components are in the right place:
To make the container initially appear at the right size, we need to set the springs that define the right (east) and bottom (south) edges of the container itself. SpringDemo3 shows how to do this. You can run SpringDemo3 using Java Web Start
and find its code in
SpringDemo3.java. Here is the code that sets the container's springs:
layout.putConstraint(SpringLayout.EAST, contentPane,
                     5,
                     SpringLayout.EAST, textField);
layout.putConstraint(SpringLayout.SOUTH, contentPane,
                     5,
                     SpringLayout.SOUTH, textField);
The first
putConstraintcall makes the container's right edge be 5 pixels to the right of the text field's right edge. The second one makes its bottom edge be 5 pixels beyond the bottom edge of the tallest component (which, for simplicity's sake, we've assumed is the text field).Finally, the window comes up at the right size:
When we make the window larger we can see the spring layout in action, distributing the extra space between the available components.
In this case the spring layout has chosen to give all the extra space to the text field. Although it seems like the spring layout treats labels and text fields differently, spring layout has no special knowledge of any Swing or AWT components. It relies on the values of a components minimum, preferred, and maximum size properties. The next section discusses how spring layout uses these properties, and why they can cause uneven space distribution.
Springs and Component Size
A
SpringLayoutobject automatically installsSprings for the height and width of each component that theSpringLayoutcontrols. These springs are essentially covers for the component抯getMinimumSize,getPreferredSize, andgetMaximumSizemethods. By "covers" we mean that not only are the springs initialized with the appropriate values from these methods, but also that the springs track those values. For example, theSpringobject that represents the width of a component is a special kind of spring that simply delegates its implementation to the relevant size methods of the component. That way the spring stays in sync with the size methods as the characteristics of the component change.When a component's
getMaximumSizeandgetPreferredSizemethods return the same value,SpringLayoutinterprets this as meaning that the component should not be stretched.JLabelandJButtonare examples of components implemented this way. For this reason, the label in the SpringDemo3 example doesn't stretch.The
getMaximumSizemethod of some components, such asJTextField, returns the valueInteger.MAX_VALUEfor the width and height of its maximum size, indicating that the component can grow to any size. For this reason, when the SpringDemo3 window is enlarged,SpringLayoutdistributes all the extra space to the only springs that can grow — those determining the size of the text field.
More About the SpringLayout API
The SpringDemo examples used theSpringLayoutmethodputConstraintto set the springs associated with each component. TheputConstraintmethod is a convenience method that lets you modify a component's constraints without needing to use the full spring layout API. Here, again, is the code fromSpringDemo3that sets the location of the label:Here is equivalent code that uses thelayout.putConstraint(SpringLayout.WEST, label, 5, SpringLayout.WEST, contentPane); layout.putConstraint(SpringLayout.NORTH, label, 5, SpringLayout.NORTH, contentPane);SpringLayout.ConstraintsandSpringclasses directly:To see the entire demo converted to use this API, look atSpringLayout.Constraints labelCons = layout.getConstraints(label); labelCons.setX(Spring.constant(5)); labelCons.setY(Spring.constant(5));SpringDemo4.java. That file also includes a more polished (and much longer) version of the code that sets the container's size.
As the preceding snippets imply,
SpringLayoutandSpringLayout.Constraintstend to use different conventions for describing springs. TheSpringLayoutAPI uses edges, which are specified by these constants:The
SpringLayout.NORTH(top edge)SpringLayout.SOUTH(bottom edge)SpringLayout.EAST(right edge)SpringLayout.WEST(left edge)SpringLayout.Constraintsclass knows about edges, but only hasSpringobjects for the following properties:Each
- x
- y
- width
- height
Constraintsobject maintains the following relationships between its springs and the edges they represent:west = x north = y east = x + width south = y + heightIf you're confused, don't worry. The next section presents utility methods you can use to accomplish some common layout tasks without knowing anything about the spring layout API.
Utility Methods for Grids
Because the
SpringLayoutclass was created for GUI builders, setting up individual springs for a layout can be cumbersome to code by hand. This section presents a couple of methods you can use to install all the springs needed to lay out a group of components in a grid. These methods emulate some of the features of theGridLayout,GradBagLayout, andBoxLayoutclasses.The two methods, called
makeGridandmakeCompactGrid, are defined inSpringUtilities.java. Both methods work by grouping the components together into rows and columns and using the
Spring.maxmethod to make a width or height spring that makes a row or column big enough for all the components in it. In themakeCompactGridmethod the same width or height spring is used for all components in a particular column or row, respectively. In themakeGridmethod, by contrast, the width and height springs are shared by every component in the container, forcing them all to be the same size.Let's see these methods in action. Our first example, implemented in the source file
SpringGrid.java, displays a bunch of numbers in text fields. The center text field is much wider than the others. Just as with
GridLayout, having one large cell forces all the cells to be equally large. You can run SpringGrid using Java Web Start.
Here is the code that creates and lays out the text fields in SpringGrid:
JPanel panel = new JPanel(new SpringLayout());
for (int i = 0; i < 9; i++) {
    JTextField textField = new JTextField(Integer.toString(i));
    ...//when i==4, put long text in the text field...
    panel.add(textField);
}
...
SpringUtilities.makeGrid(panel,
                         3, 3, //rows, cols
                         5, 5, //initialX, initialY
                         5, 5);//xPad, yPad
Now let's look at an example, in the source file
SpringCompactGrid.java, that uses the
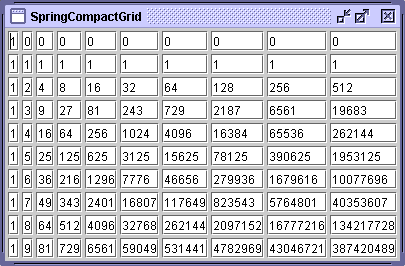
makeCompactGridmethod instead ofmakeGrid. This example displays lots of numbers to show off spring layout's ability to minimize the space required. You can run SpringCompactGrid using Java Web Start. Here's what the SpringCompactGrid GUI looks like:
Here is the code that creates and lays out the text fields in SpringCompactGrid:
JPanel panel = new JPanel(new SpringLayout());

int rows = 10;
int cols = 10;
for (int r = 0; r < rows; r++) {
    for (int c = 0; c < cols; c++) {
        int anInt = (int) Math.pow(r, c);
        JTextField textField =
                new JTextField(Integer.toString(anInt));
        panel.add(textField);
    }
}

//Lay out the panel.
SpringUtilities.makeCompactGrid(panel, //parent
                                rows, cols,
                                3, 3,  //initX, initY
                                3, 3); //xPad, yPad
One of the handiest uses for the
makeCompactGridmethod is associating labels with components, where the labels are in one column and the components in another. The fileSpringForm.javauses
makeCompactGridin this way, as the following figure demonstrates . You can run SpringForm using Java Web Start.
Here is the code that creates and lays out the label-text field pairs in SpringForm:
String[] labels = {"Name: ", "Fax: ", "Email: ", "Address: "};
int numPairs = labels.length;

//Create and populate the panel.
JPanel p = new JPanel(new SpringLayout());
for (int i = 0; i < numPairs; i++) {
    JLabel l = new JLabel(labels[i], JLabel.TRAILING);
    p.add(l);
    JTextField textField = new JTextField(10);
    l.setLabelFor(textField);
    p.add(textField);
}

//Lay out the panel.
SpringUtilities.makeCompactGrid(p,
                                numPairs, 2, //rows, cols
                                6, 6,        //initX, initY
                                6, 6);       //xPad, yPad
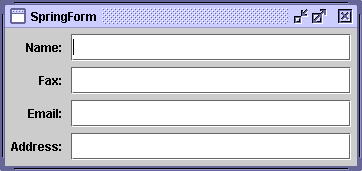
Because we are using a real layout manager instead of absolute positioning, the layout manager responds dynamically to changes in components involved. For example, if the names of the labels are localized, the spring layout produces a configuration that gives the first column more or less room, as needed. And as the following figure shows, when the window is resized, the flexibly sized components — the text fields — take all the excess space, while the labels stick to what they need.
Our last example of the
makeCompactGridmethod, inSpringBox.java, shows some buttons configured to be laid out in a single row. You can run SpringBox using Java Web Start
.
Note that the behavior is almost identical to that of
BoxLayoutin the case of a single row. Not only are the components laid out asBoxLayoutwould arrange them but the minimum, preferred, and maximum sizes of the container that uses theSpringLayoutreturn the same results thatBoxLayoutwould. Here is the call tomakeCompactGridthat produces this layout://Lay out the buttons in one row and as many columns //as necessary, with 6 pixels of padding all around. SpringUtilities.makeCompactGrid(contentPane, 1, contentPane.getComponentCount(), 6, 6, 6, 6);Let's look at what happens when we resize this window. This is an odd special case that's worth taking note of as you may run into it by accident in your first layouts.
Nothing moved! That抯 because none of the components (buttons) or the spacing between them was defined to be stretchable. In this case the spring layout calculates a maximum size for the parent container that is equal to its preferred size, meaning the parent container itself is not stretchable. It would perhaps be less confusing if the AWT refused to resize a window that was not stretchable, but it doesn't. The layout manager cannot do anything sensible here as none of the components will take up the required space. Instead of crashing, it just does nothing, leaving all the components as they were.
The SpringLayout API
The API for usingSpringLayoutis spread across three classes:
SpringLayout Constructor or Method Purpose SpringLayout()Create a SpringLayoutinstance.SpringLayout.Constraints getConstraints(Component)Get the constraints (set of springs) associated with the specified component. Spring getConstraint(String, Component)Get the spring for an edge of a component. The first argument specifies the edge and must be one of the following SpringLayoutconstants:NORTH,SOUTH,EAST, orWEST.void putConstraint(String, Component, int, String, Component)
void putConstraint(String, Component, Spring, String, Component)Convenience methods for defining relationships between the edges of two components. The first two arguments specify the first component and its affected edge. The last two arguments specify the second component and its affected edge. The third argument specifies the spring that determines the distance between the two. When the third argument is an integer, a constant spring is created to provide a fixed distance between the component edges.
SpringLayout.Constraints Constructor or Method Purpose SpringLayout.Constraints()
SpringLayout.Constraints(Spring, Spring)
SpringLayout.Constraints(Spring, Spring, Spring, Spring)Create a SpringLayout.Constraintsinstance. The first two arguments, if present, specify the X and Y springs, respectively. The second two arguments, if present, specify the height and width springs, respectively. Omitting an argument causes the corresponding spring to benull, whichSpringLayoutgenerally replaces with suitable defaults.Spring getConstraint(String)
Spring getHeight()
Spring getWidth()
Spring getX()
Spring getY()
void setConstraint(String, Spring)
void setHeight(Spring)
void setWidth(Spring)
void setX(Spring)
void setY(Spring)Get or set the specified spring. The string argument to the getConstraintandsetConstraintmethods specifies an edge name, and must be one of theSpringLayoutconstantsNORTH,SOUTH,EAST, orWEST.
Spring Method Purpose static Spring constant(int)
static Spring constant(int, int, int)Create a spring that does not track a component's sizes. The three-argument version creates a spring with its minimum, preferred, and maximum values set to the specified values, in that order. The one-argument version creates a spring with its minimum, preferred, and maximum values all set to the specified integer. Despite the name, springs returned by
constantare mutable. To make a layout work out,SpringLayoutmight be forced to adjust a "constant" spring. For this reason, you should avoid reusing constant springs unless (1) you truly want the springs to always be precisely alike and (2) other springs provide some flexibility in the layout.static Spring sum(Spring, Spring)
static Spring max(Spring, Spring)
static Spring minus(Spring)Create a spring that is the result of some mathematical manipulation. The summethod adds two springs. Themaxmethod returns a spring whose value is always greater than or equal to the values of the two arguments. Theminusmethod returns a spring running in the opposite direction of the argument. Theminusmethod can be used to create an argument for thesummethod, allowing you to get the difference between two springs.int getMinimumValue()
int getPreferredValue()
int getMaximumValue()Get the corresponding value from the spring. For a SpringLayout-created spring that automatically tracks a component, these methods result in calls to the component's correspondinggetXxxSizemethod.int getValue()
setValue(int)Get or set the spring's current value.
Examples that Use SpringLayout
The following table lists some examples that use spring layout.
Example Where Described Notes SpringDemo3This page Uses SpringLayoutto create a row of evenly spaced, natural-size components.SpringDemo4This page Reimplements SpringDemo3 to use SpringLayout.ConstraintsandSpringdirectly.SpringGridThis page Uses SpringLayoutand themakeGridutility method to create a layout where all the components are the same size.SpringCompactGridThis page Uses SpringLayoutand themakeCompactGridutility method to create a layout where all the components in a row have the same height, and all components in a column have the same width.SpringFormThis page Uses SpringLayoutandmakeCompactGridto align label-text field pairs.SpringBoxThis page Uses SpringLayoutandmakeCompactGridto demonstrate laying out a single row of components, and what happens when no springs can grow.SpinnerDemoHow to Use Spinners Uses SpringLayoutandmakeCompactGridto lay out rows of label-spinner pairs.TextInputDemoHow to Use Formatted Text Fields Uses SpringLayoutandmakeCompactGridto lay out rows of labeled components. The components are a mix of text fields, formatted text fields, and spinners.
|
|
Start of Tutorial > Start of Trail > Start of Lesson |
Search
Feedback Form |
Copyright 1995-2005 Sun Microsystems, Inc. All rights reserved.


